Magnetic field created by two wires
Contents
Experiment description
The magnetic field exists all arounds us. It can be created by natural terrestrial and sidereal sources or by man. We can distinguish two tipes of fields, (i) constant fields with reduced influence in biological systems and (ii) variable fields (AC), capable of inducing electrical currents. The latter, if intense enough, can be harmful, mainly for people with electronic prosthetics (e.g. pacemakers).
However, most electric circuits, including power transmission lines, are closed, meaning that the electric charge will eventualy return to the source (generator or battery) via cables in close proximity of each other. This is also what happens in domestic circuits where, the most observant have certainly already noticed, cables are always paired (the third wire is usually the 'earth' and doesn't carry power in normal operation, existing only for safety reasons).
The objective of this experiment is to determine the magnetic field vector created by two parallel conductors in several points in space. To achieve this, the experiment has a 3D micro-probe capable of detecting the intensity of the magnetic field in the selected points. The advanced protocol suggests a more mathematically demanding solution, where the full geometry of the rectangular coil is considered.
Since electrical currents always return to the generators, power transmission lines and many other electromagnetic devices exhibit behavior similar to the one described and studied in this experiment.
Links
- Video: rtsp://elabmc.ist.utl.pt/mag3d.sdp
- Laboratory: Intermediate in elab1.ist.utl.pt
- Control Room: Mag_3D
- Recording
- Grade: **
Who likes this initiative
Experimental Apparatus
Description
This experiment consists of a 20 turns rectangular coil that can, in first aproximation, be approached as two parallel copper wires carrying an electrical current that generates a magnetic field. The flux of the generated magnetic field is detected by a 3-axis micro-probe (pick-up coil), allowing the reconstruction of the magnetic field vector in the previously selected plane. For practical reasons, the plane where the measurements are made is 15mm below the rotation axis of the coil.
The reasoning behind this implementation as a rectangular coil (with one dimension much larger than the other) is that the current must be closed at the extremeties.
| Smaller side (2a) | 89mm +/- 0.5mm |
| Larger side (2b) | 454mm +/- 0.5mm |
| Number of turns | 20, (AWG 24) |
The micro-probe is made of 3 square coils with 10 turns each, winded on a PVC cube with side 5mm. Each of these coils is aligned with 3 orthogonal axes, and therefore the flux of the magnetic field in that small volume is determined in each axis. It is worth noting that an AC excitation current (30kHz) is used in order to minimize the effects of the Earth's magnetic field and other randomly ocurring fields. Futhermore, the detected magnetic field signal is adequately amplified by purpose built electronics (tuned filter) that reject signals with different frequencies. No metal is used in the proximity of the coils so as to not change the original configuration of the magnetic field.
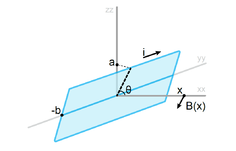
The experiment allows the configuration of the angle of observation to the plane of the longer cables and the radial sweep of the distance to them, along the xx axis. It is possible to map the area around the cables by making several sweeps. A 0º angle corresponds to positioning the coil vertically (aligned with the zz axis), creating a field mainly in the zz axis direction. At 90º, the coil is aligned with the xx axis. In practice, the coils rotates around the yy axis and the micro-probe moves along the xx axis.
Coil orientation
The definition of coil orientation is related to the direction of the magnetic field it creates according to the right-hand rule: the adopted definition is that a coil is vertically aligned ─ zz axis ─ if its turns are winded in the xx-yy plane.
Again, it is worth noting that the micro-probe moves slightly below (15mm) the conductors so it can move below them during a sweep. This is relevant on the advanced protocol in the area near the condutors but not for the calculation of the far field.
It is important to note that it's possible that the signal saturates when the probe is close to the wires. Due to this, the selected current should be lowered when studying the region near the conductors.
Configuration
To execute the experiment, the user must define the following parameters:
- Initial position
- Location of the first sample to be taken. The origin is the axis of the coil;
- Final position
- Location of the last sample to be taken;
- Number of samples
- Number of positions where the three componentes of the magnetic field and the current on the coils are measured;
- Current in the coil
- Value, in percentage, of the modulation of the current per turn. This allows the aproximate selection of the value of the current in relation to the maximum. To determine the maximum value of current, it's necessary to run the experiment with modulation 100%. This parameter is essential to avoid the saturation of the measurements in the region near the coil.
- Angle
- Allows for the orientation of the coil to be selected, according to fig.1
Results
After launching the experiment, a table with date/hour of each measurement, the absolute position in the xx axis, and the elements measured in each point: the intensity of the components of the field vector and the current that is going through the coil, is returned.
Furthermore, the application allows the visualization in real time of the data being collected.
MEDEA
This experiment is used by schools part of the MEDEA project, a partnership between SPF and REN, Redes Energéticas Nacionais. MEDEA is the acronym for MEDição dos campos Electromagnéticos no Ambiente (measurement of electromagnetic fields in the environment). Participants are students of secondary and profissional schools.
Physics
The determination of the magnetic field implies integrating the Biot-Savart law along the coil, summing in a point of space all the infintesimal contribuitions. However, due to the geometry of the problem, a simpler approach can be taken by considering that the conductors are infinite.
Field generated by two infinite cables
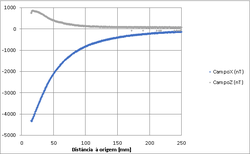
In the plane where both cables exist
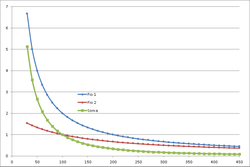
The magnetic field decayment of a single conductor is function of (~1/r). However, considering two conductors of negligible diameter separeted by d=2a, where one carries the return current of the other, the effect of both conductors gives a much faster decayment, function of (~1/r^2) for distances much larger than the distance between conductors.
This can be verified through the simplified expression, obtained by Gauss's Law and calculated in the plane of both conductors:
[math] B_{Total}=B_1+B_2=\frac{\mu _0 i}{2 \pi (r-a)}- \frac{\mu _0 i}{2 \pi (r+a)}\simeq \frac{\mu _0 i a}{\pi r^2}, r\gg d [/math]
where
[math] \frac{\mu _0 i}{2 \pi r} [/math]
is the intensity of the magnetic field criated by a single infinite linear conductor.
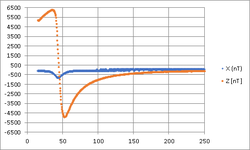
The figures show values obtained experimentally. Only relevant dimensions are show (it can be shown that, by simmetry, the field along yy is negligible).
In the symmetry plane between cables
In this situation, the angle of the coil with the xx axis is 90 and, by symmetry, there is only field along xx in the axis orthogonal to the plane defined by the conductors. In a far region, it can be considered that the distance r to the plane, given by [math]\sqrt{a^2+x^2}[/math], is approximately the ordinate along the axis and the fields created by both cables ─ separated by a distance of 2a ─ add up to generate a field with double the intensity:
[math] B_{Total}=B_1+B_2 \approx 2 \times \frac{\mu _0 i}{2 \pi \sqrt{a^2+x^2}} \cdot \frac{a}{\sqrt{a^2+x^2}} = \frac{\mu _0 i a}{\pi (a^2+x^2)} [/math]
for [math] x \gg a [/math], this simplifies to:
[math] B_{eixo}= \frac{\mu _0 i a}{\pi x^2} , x \approx r\gg a [/math]
Field generated by a rectangular coil
The study of the rectangular geometry implies the calculation of the magnetic field through the integration of the contribuition of infinitesimal current elements along the coil[1]:
[math] d{\bf{B}} = \frac{{\mu _0 }}{{4\pi }}\frac{{Id\ell \times {\bf{\hat r}}}}{{r^2 }} [/math]
This integration can be simplified considering that the probe moves only along the xx axis, with z=y=0 (for practical reasons, the real position is aproximated y=-10mm≃0), and by simmetry, it can be established that the field along yy is 0.
Experimental studies
Field orientantion
It's not always easy to visualize a vectorial field. The best way to proceed in the analisys of this experiment is to use software that allows the visualization of the magnetic field vectors every 10mm in a tridimensional projection.
For this, Octave, Mathematica, Python, IDL, or Matlab are suggested. In this link (BiotSavart.ipynb) a Jupyter simulation is shown.
Field lines and level curves
Running the experiment several times with diferent coil angles, it is possible to map the values of the direction and intensity of the magnetic field in the xx-zz plane. Field lines follow the field vectors spacially and allow the identification of the orientation of the magnetic flux. Level curves connect points where the intensity of the field is constant. It's, therefore, possible to identify the points with larger variation by analising the distance between curves.
Bibliography
- ↑ Introdução à Física, Jorge Dias Deus (McGraw-Hill)


